Primary Chalkboard

5 Tips for Effective Writing Conferences

Hi! It's Nicole from Mrs. Rios Teaches. I am so happy to be piggybacking off of Randi's excellent post yesterday, about how to make writing your students' favorite time of the day.


Today, I am going to be sharing some general tips about how to hold effective writing conferences.  Now, before I begin, there are no hard and fast rules about how to conference. You are not doing it wrong. I don't feel I am either.  Everyone has to make it work for themselves, and most importantly, their students.  I am just going to share some conferencing practices that have worked for me.


1) CELEBRATE! : I'm going to tell the truth here, and admit that I used to be the kind of writing teacher that would look at a young 2nd grader's writing and focus on all of the grammar, punctuation, and spelling mistakes. Many years, and several professional books later (Thank you Lucy Calkins!), I now place the least amount of emphasis on those things with my young writers.  I use our writing time to develop enthusiasm, stamina, fluency, creativity, and voice.  This is the time to praise, praise, praise!  Getting my students to the point where they look forward to writing workshop has been THE biggest factor in making my students better writers.  It all starts with letting them know they are authors, and making them aware of where they are being successful in their craft.


2) SHOULD I STAY OR SHOULD I GO, NOW? :  "if I go there will be trouble, and if I stay it will be double..."  Anyone else remember that song? Ha, ha.

Every time I see a picture of a teacher conferencing, they are crouched down next to the student's desk.  After they finish up, they move on to the next student.  I tried this.  Honestly, I did.  But, I was never able to meet my goal of seeing 5 students per day.  Perhaps if I would have carried a timer with me, I could have accomplished my goal.  But, that just didn't feel respectful or authentic to me.

I have had much greater success with sending 5 students to go begin their writing at our group table, right after our mini-lesson.  Then, for the first 5 minutes of writer's workshop I just wander through and make sure everyone is ok, and on the right track.  Sometimes I am just reminding Juan to put on his glasses, or Stevie to use his Spaceman stick for spacing.  My students also know that this is a good time to have me write words in their personal dictionaries. They raise their dictionaries in the air, open to the first letter in the word.  After about 5 minutes, there is a purposeful, yet quiet hum to the classroom. This is when I head back to my little group.  I almost always get through all 5 students in a session. But, if I don't, I call the ones I missed at a later time, or during our next WW session.


3) HAND OFF!  Pre-LC (before Lucy Calkins) I used to have my trusty red pen ready at all times. (I know.  I was a nightmare.) By the time I had finished reading a student's paper, evidence of my gruesome assault on their writing could be seen from beginning to end.  The result?  My students and I were overwhelmed and defeated.

Respecting students' writing as theirs, is so important.  Now, I do not write on my students' writing.  Any helpful comments or suggestions that I share in written form, are done on post-its. The result?  My students are more invested, and retain greater ownership over their writing.  This has increased their independence as writers, as well as the quality of their writing.  They are proud of their writing, and want to create the best piece that they can.


4) STAY FOCUSED :  When it comes to writing conferencing, less is absolutely, positively, more.  With young writers, there will be a lot to fix.  So much that it may make your eyes burn.  I start my conferences with asking students to share their writing with me, and offering at least 2-3 compliments on things they have done well.  Then, I make one suggestion about how to strengthen their writing piece.

5) DOCUMENT, DOCUMENT, DOCUMENT :  Keep a record of your conferences with each student,  My individual student form has a place for the date, notes on what the author is doing well, and a space for notes on what I taught them during our conference, or what lesson they might need in the future.  I review the notes on all my students before I plan my next week of writing instruction.  I focus on shared needs, or small groups of students that might need the same lesson.  Sometimes, I will see glaring issues that I will need to address in a whole class mini-lesson.  These notes are like gold, and the more you use them to drive your instruction, the more growth you will see in your students.

Don't forget to check out all of July's informative posts:


Thanks for stopping by.


Easy Tips for Teaching Writing

Hello friends.  This is Randi coming to you from Teach It With Class.  I am going to share with you 4 super easy writing tips that will help make your writing lessons smoother.  


All of my tips are easy-peasy and can be put into practice tomorrow!
First a little background information.  I’m passionate about writing.  I’ve learned so much over the years and I think it’s undeniable that better writers make better readers.  I also think teaching writing to this generation and the generations to come is going to be crucial to our future.  Our children are growing up in a world of selfies and status updates and it’s more important than ever to bring some substance to the table. Below are 4 tips to help your writing lessons flow.


In my classroom I work hard to make writing one of our favorite times of the day.  The goal is to make a relaxing classroom atmosphere where creative juices can flow.  It’s also important to make it a safe atmosphere for students to express themselves without feeling pressure or judged.  You may be amazed what your students will write if you give them enough time and freedom to write.  It’s important they feel safe in your classroom and free to do this.  I play relaxing music as soon as students settle in to write and in my current classroom I dim the lights.  I have 2 light switches and I turn one off and leave one on.  This still gives us plenty of light.  You may simply be able to turn some lamps on/off or open/close the blinds.  


I know, I know.  Paper costs money, copies cost money, you have so much of it sitting in the cabinet…I get it. I promise I do.  I have experimented with this for years and the proof is in the student work.  When a student writes on a sheet of paper or in a notebook that they can be proud of they will produce a higher quality piece of work.  So what can you use instead? 1) I always have lined writing paper copied double sided that can be used for any writing lesson.  2) When a lesson calls for it,  I use themed paper with a writing prompt or title already given at the top of the page.  3) I use a writing journal or notebook.  It just depends on the lesson/topic and what works best for you.  I strongly encourage you to throw out the other stuff!


During writing time my students are actively writing and I am buzzing around the room with post it notes and my big pink eraser.  When teaching students to write, my focus is conventions and content.  However, sometimes a student can spend way too long trying to spell carnivore. It’s not that they shouldn’t stretch it out and try to write the sounds they hear, they should…but sometimes those struggling writers will just get stuck and STOP.  I write carnivore on a post it.  Slap it on their desk and just move on. I typically do this for proper nouns and content vocabulary. I don’t do this for sight words, words posted in the room already, or words that can and should be sounded out (with, cheese, blue etc…).  I don’t do it for every word or for every student but it helps build confidence in those strugglers.


This may sound harsh but just hear me out.  As I said during writing time, I’m buzzing around the room.  I am reading what my students are writing out loud next to them as they write.  This helps them hear their own words as we listen together for mistakes.  If a mistake is found, it’s time to erase and fix our words.  Well, have you ever stood next to a student and waited for them to erase their work so they can fix it?  It’s pretty much like watching paint dry.  As an added bonus, students are often not yet sure of their mistake and they erase the wrong part of their writing. Then you have two things to fix which takes up precious time.   The solution is to carry your own teacher eraser (I fancy the big pink ones) and erase it for the student.  Quickly guide the student on how to correct the mistake and move on.   To make sure each writing lesson doesn’t end in tears, I tell students from the beginning I am doing this to save time.  I will be erasing something on everyone's paper at some point.  It’s nothing to be sad about.   Most students accept this explanation with grace.  If you happen to come across a student who doesn’t like it, you don’t have to do it with that student.  Plus, if you’re still using the grayish mystery material teacher paper from the cabinet, you have a better chance of erasing the writing without ripping the paper than your beginning writer does. 

I could write for days about teaching writing but I'll wrap up for now! I hope you enjoyed my tips and are having a fabulous 4th of July weekend!

The Primary Chalkboard authors have a great month planned for you! Read all about it here and mark your calendars!


Back to School Tips and Ideas for New Teachers

Hi there friends, it's Emma from Clever Classroom

Recently I asked my Facebook fans what tips they would give a new teacher to help them save some money and get organized for back to school (see post here). 

I wasn't surprised to read that so many of them knew of different ways to save and get organized. 

Here are ten tips for new teachers, well any teachers. 

Back to School Tips and Ideas for New Teachers


1. Be prepared to spend money. Most of our Facebook fans mentioned that they spend between $200-$1,000 per year. 

2.  Join Scholastic to get discounted books. Try their Teacher Express store by clicking the image below.


3.  Visit yard sales and second-hand stores to find discounted books and games. You can search Craig's List or your local paper for the ones in your area. 

4.  Visit discount stores like The Dollar Store or The Dollar Tree for storage containers, games, craft, stationery and even furniture.

Try Dollar tree's online store here.

Dollar Tree Online Tips for Teachers Starting the New Year

5.  Save your receipts for taxation purposes.  You might like to use the new app; Expensify to scan your receipts. Here's a link to their website.  Here's a link to their FREE app.


Expensify app for teachers


6.  Ask your school if they have a budget for teachers to purchase consumables and or resources for the classroom. 

7.  Find a veteran teacher that is willing to help you. You might be able to borrow items. 

8.  Decide on a theme or even a color theme and shop for those items. 

9. Look for sales online and in catalogs. 

10.  Shop on Teachers Pay Teachers, there are so many resources that are bundled to help you save


Find 20 more tips over on my blog.

Back to School Tips Primary Chalkboard blog


Check out even more tips and ideas from the authors here at the Primary Chalkboard. 

Primary Chalkboard posts for July


Be sure to follow us here at the Primary Chalkboard to see more tips and tricks from our authors. 

Primary Chalkboard blog

Thanks for dropping by. 


Tutoring Tips


Hello! It's Sarah from Sarah's First Grade Snippets.  I hope you are all enjoying your summer break so far! Since most of us are not teaching in classrooms right now, I thought it would be the perfect time to talk about tutoring. Before I had kids, I was tutoring like crazy during the summer! I would literally tutor from 8am to 4pm four days a week. It was before the days of blogging, TPT, and kids so I had the entire summer to myself. Tutoring was the perfect way to get some summer cash and fine-tune my teaching skills in my earlier years of teaching.  Now, I don't tutor all day during the summer, but I did start tutoring two kids during the school year at my son's school. It had been a while since I tutored, but it's very similar to what I do for my actual job (reading pull-out.) One big difference was that at my actual job I have a big classroom to store all of my things. When I'm tutoring, I go into another school so I had to haul all of my things with me. That brings back memories of my earlier summer tutoring. I would literally roll in a suitcase full of stuff to the public library and station myself at a table all day. Ha! Well, I've evolved a little. Now I have a cute teacher bag and a binder that go with me and a filing system at home. Earlier in the year, I posted a picture of my tutoring binder on Instagram. I had some requests to see more, but just never got around to it. I thought I'd share some of my tutoring tips today. :) 


Don't lug around a suitcase like I did early on! Unless you tutor in your classroom, you will need to be prepared and organized. My tutoring sessions usually last between 30 and 45 minutes so I need to make sure I have engaging and meaningful activities to fill that time. Keeping this stuff organized is key for your own sanity! Also if you are totally organized, it makes your tutoring session flow much more smoothly.  


This year, I carried a teacher bag with this binder. I had a separate filing system at home filled with more tutoring stuff.  Everything I need for that day is in my binder. 

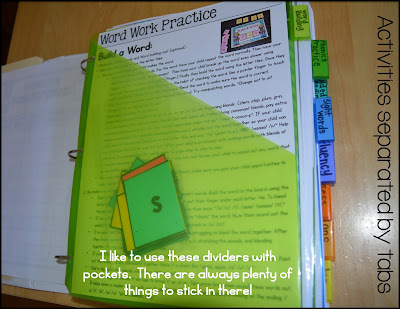
I use these divider pockets to separate parts of the lesson.I like the ones with pockets because I always have things to fill them with! The picture above shows the different tabs I use for my binder. For each session, I do a phonics lesson, sight word practice, a fluency exercise, and guided reading.  At the end of my binder there are tabs for lesson plans, notes, and assessments. 


Since you may be tutoring in a room with no materials besides a pencil waiting there for you, you should definitely come prepared with your own pouch of goodies. Above is a picture of what I have in mine. 


You can create your own word building mat and tiles. You can cut index cards into smaller rectangles for the letter tiles and use a regular piece of paper to draw a word building mat. 

I have two phonics tabs in my binder. One is for introducing the phonics skill (the building words) and the other is for addition practice. I usually have 2-3 more activities to follow up my introduction. These are less guided and more for the student to practice sounding out words using that phonics rule.  Some simple activities include word sorting and matching up onset and rime. There are all sorts of resources on TPT for this! 


When you are planning your sight words, there are a few more tips:

1. Get a list (dolch, fry, or a list your district uses)
2. Find out what words your student already knows (this means they read them instantly on sight)
3. Keep a checklist of which words you taught and which they mastered. 
4. Introduce 3-5 at a time, depending on where they are at. Don't try to throw a bunch of new words at them. To make them stick, your student needs to practice them over and over in different ways. For your beginning readers, you may only want to introduce two at a time.  
5. Review previously learned sight words. This is good for two reasons: It's good to review so they go  deeper into their stored memory and it helps with confidence/flow when you are playing a sight word game.  Have a stack of notecards with the words that you have worked on, plus some that they already knew. Begin by going through this stack. 
6. For your new words, add a multi-sensory experience by tracing the word in glue. You can add glitter or just keep the glue. Then let your student trace and feel the word. You could also use Wikki sticks and pipe cleaners to make the word. That way, your students can feel the word and build the word in a different way. These materials are also easy to carry around. :)


There are so many awesome ideas on TPT for practicing sight words! 

Here is a simple activity to add to your toolkit: 


This is an activity that you can make on your own using a file folder. Games are fun, but your student does need to be seeing the word, tracing the word, and writing the word. This activity is perfect for that. 


Your plan doesn't have to be super detailed. I just think about two main things: what am I teaching and how am I teaching it. In this picture below, you see the what under the skill.  The how is under the method


Here is an example of what you could use if you are tutoring more than one person in a day. I used something like this in my earlier years and it helped me stay organized with all those kids! In the boxes, you can include the what and the how together.  

I plan it out first, then I "pack" my binder with the things I'll need. 


I use Readinga-z for my assessments. They have Guided Reading assessments a phonics inventory.
This is honestly the best investment! I first bought a subscription my first year of teaching and I was so happy I did. It's SO worth it! Look at all these options:
Once you've assessed your student, you are ready to plan your instruction!


I'm constantly changing the way I assess and keep notes from year to year in my own classroom. It's a problem. Don't be like me. Choose a way and stick with it! Here are some ways that I keep track of my students' sessions and assessments. 

The top left is used when the student is reading a book or reading passage. I do a quick check using this page. The checkmarks under the running record column show a snapshot of their reading for that day. Then I go back and "grade" their fluency, comprehension, use of phonics skills, and sight word knowledge with a simple plus, check or minus. 
The Snapshot Assessment is what I fill out at the end of the session. It includes all the pieces of the session. I "grade" with a scale of 1-4. This helps me keep track of their progress. 
The Phonics Snapshot is used specifically to keep track of phonetic skills. It goes into more detail (can they blend, can they segment, are they fluent with reading those phonetic words.) I mainly use this with my beginning readers. The last picture is my phonics quick check form. For time sake, I might only check half of it in one session and half in another. I use that when I think a child is ready to move on to the next skill. You certainly do not have to be this detailed! Choose one that works for you and go with it! :) It could be as simple as a box to take notes!  

 
One mistake I made super early on was that I spend too much time having my student read a book. Although it's important to practice reading real books, they can do that with their parents. They can do that on their own. We need to provide them with instruction and guided practice. Our struggling readers see a book as a daunting task. It's big, filled with too many words. Sigh. I find it really helps to give students opportunities to read in smaller parts. If you are working on fluency, they need to have opportunities to reread things. It makes sense that those texts need to be short so you have the time to reread them. I use short reading passages or story cards (in my Super Reader pack or any seasonal guided reading pack.) Whatever you choose to use, make sure it is an appropriate level and not too long. Choose one focus each day: expression, rate, stopping at punctuation, etc. Model it first and again after they read so they can hear good fluency. 


When I'm tutoring, I often pull from these resources:

Sentence Scrambler:


Head on over to my blog if you want to read more about my Tutoring Toolkit. 


Don't forget we have TONS of great posts in store for you this month. You can read more about it, by clicking here